This guide is no longer necessary since software update 4.5xx because they made the USB recovery key unnecessary. I guess they had too many problems with it.
Disclaimer
This guide worked for 2 people that had the problem where the Fibaro HC2 would not boot with the recovery stick connected, while it did boot without it. This guide might not work for you. You can even break things if you do things wrong. I am also not affiliated with Fibaro in any way, and I advise you to contact Fibaro and handle maintenance of your Home Center 2 with Fibaro directly. Home Center 2 and all their software is all copyright Fibaro Group and it is not the intention of this guide to facilitate illegal copying of their software. I cannot be held responsible for any damage caused by following this guide.
Again: I am not accepting any liability or responsibility for any of this information. It is provided as a courtesy and provided as-is without any warranties or guarantees. You have been warned. In fact I’m covering my ass here and basically just saying; don’t do this. All I’m saying is, it worked for me.
Background information
Now that that’s out of the way…. the Fibaro Home Center 2 is an automation system that functions as the hub of your home automation. It uses the Zwave protocol to connect to various devices throughout the house to regulate things like automatically turning on sprinklers, switching on/off the lights, and even has alarm functions that can sound an alarm if a door or window sensor is triggered when everybody is out of the house. In order to make sure that your configuration and automation programs that you have created over time are kept safe, and to give you a way to ‘factory reset’ the HC2, a USB recovery key comes with the HC2. It is plugged into the side/inside into a USB port and is always there, ready to be activated with a push of a button, to make a backup, or to start recovery and restore the software in the HC2.
USB sticks work with flash memory. This has a limited life span. After an x amount of times reading/writing eventually the flash cells wear out and stop working. Every time your HC2 boots up, it first checks the recovery USB key, and when it finds that the HC2 can boot normally, it will boot from an internal storage where the main operating system is, and the HC2 boots up normally. If the recovery USB key is broken, the system can hang on this. It will stay in the BIOS usually with code BE shown (if you were to attach a monitor to the HC2) and just wait there forever and ever. If you take the recovery USB key out, the system will find the internal storage and boot from there and the HC2 will function. But, you can’t make backups now, and you can’t use the recovery function anymore.
The problem
The USB recovery key has a unique vendor name (FIBARO), product name, and serial number, that are all somehow tied into the software/hardware of the HC2. You can’t just use any old USB stick; you HAVE to use their USB key. Unfortunately, when your recovery USB key is broken, you can’t just send Fibaro the old one, and get a new one back. They won’t do it. I’m pretty damn sure that if they wanted to, they could make it possible to get some information from your HC2, and send you a new recovery USB key that matches your system, but they won’t. Their ONLY solution is to pack up your HC2 and recovery USB key, and ship it to them in Poland. They will then fix it and send your HC2 back to you. This means being without your HC2 for days, weeks maybe. Unacceptable.
Possible solution
So if your recovery USB key is broken, you’re doomed. But in many cases, the damage is only to a few flash cells and with luck, you can still read the information off of it (even if painfully slowly) and restore the USB key to proper functioning by running a low-level scan/format on it using specialized tools. This checks the flash memory on the USB stick for faults, and if it finds a fault, it blocks them from use and works around it. You lose some bytes of storage with this process but I’ve found that there’s actually only 3 partitions on the stick that span 4 gigabytes, but the stick itself is 8 gigabytes. So only 50% is ‘used’ and there’s plenty of spare space to go around.
The specialized tools to use. Please note that I’m linking local copies that may be outdated. But I want to be sure these files are available even in the future. You may find newer and better versions by looking them up directly on the Internet:
- Win32DiskImager 0.9.5 or Acronis True Image (both tested to work)
- ChipGenius 4.00.1024 (reads information from USB sticks)
- UPTool Ver 2.093 (tool to check/change flash cell parameters)
The steps to take in short (details on ChipGenius / UPTool in Screenshots section further down):
- Make an image of your recovery USB key first! This is your backup. You need this!
- Try to write the backup image you just made, back to the recovery USB key.
This may already solve your problem! Test it! If it fails, move on to step 3. - Use ChipGenius to see if you have VID 13FE and a serial number; save all this information.
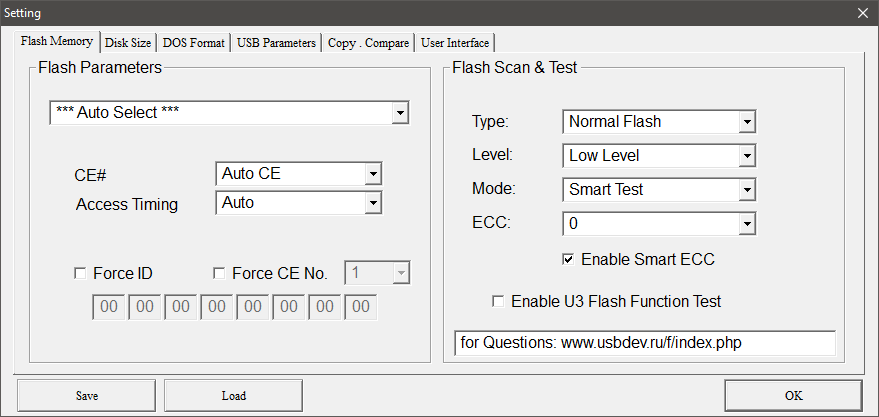
- Use UPTool to do a Normal Flash, Low Level, Smart Test, with Smart ECC enabled.
Configure USB parameters to match ChipGenius info. - Afterwards, use UPTool again, to do a Normal Flash, High Level.
Use the same USB parameters again, matching ChipGenius info. - Restore the backup image taken earlier, to the recovery USB key.
- Power down the HC2 and place the recovery USB key back in, then power it up.
Details on Win32DiskImager
The USB key itself is usually an 8GB GOODRAM (Kingston) stick, with 3 partitions on it spanning a total of 4GB of space. The other 4GB is left completely unused. If you use Win32DiskImager, and successfully read the image file to your computer, then you get a 4GB image file. You should be able to write this image file back to the recovery USB key. If that fails because the flash cells have deteriorated, then attempt the repair procedure. After repairing/bypassing the recovery USB key’s broken flash cells, the total disk space on the key will be less than before. Usually only a few thousand bytes short of 8GB. Writing the 4GB image file back to the recovery USB key should fit just fine on the 8GB recovery USB key.
If you haven’t made a backup yet, or your system is currently functioning normally, I would definitely suggest making a backup with Win32DiskImager now, to keep it safe. You need to make the backup if you intend to use the repair procedure with UPTool. If you don’t, your stick will be wiped by UPTool during the repair and you will have lost your data. To make a backup, get Win32DiskImager, or use your own choice of imaging software; you will need this. This guide assumes you are using a Windows computer with Win32DiskImager. For Mac or Linux, find online guides on how to make an image backup. To make the image follow these steps:
- Insert your recovery USB key on your Windows PC.
- The recovery USB key contents look like this:
backups
logs
system
network.conf - When Windows Explorer sees your stick, it gets a drive letter.
- Remember this drive letter. In my case it is (G:).
- Open Win32DiskImager and on the right you will see Device.
Set this to the drive letter that your recovery USB key is on. - Click the blue folder icon.
- Go to the location where you want to save your backup image.
- Type a filename, like “HC2recoverybackup.img” and click “Open”.
- Click on the “Read” button. DO NOT CLICK WRITE
This reads the recovery USB key and saves your backup image. - Wait until it completes. You now have a backup image file.
You can use the ‘Write’ function to write the image file on your computer back to the recovery USB key. In some cases, this is enough and it will work again now. In other cases, your flash cells are toast and need to be checked with UPTool as described below. If you are unable to read the image at all, see the troubleshooting section at the bottom.
Details on ChipGenius / UPTool
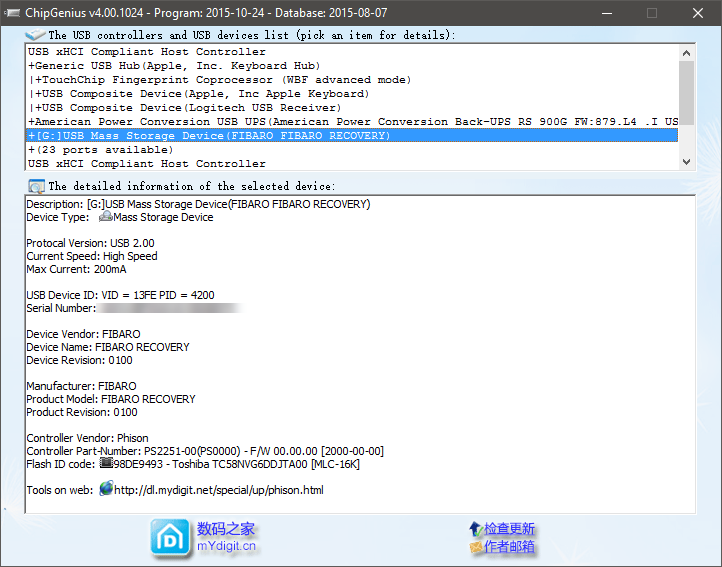
Check with ChipGenius if you have a similar device as shown in the screenshot below. The VID should definitely be 13FE, but if your PID is slightly different (4100, 4200) that should still be okay. Make a note of the serial number! You need to use the information here later in the USB Parameters section of UPTool. The controller should definitely be by Phison, the UPTool program is made for Phison controllers only.
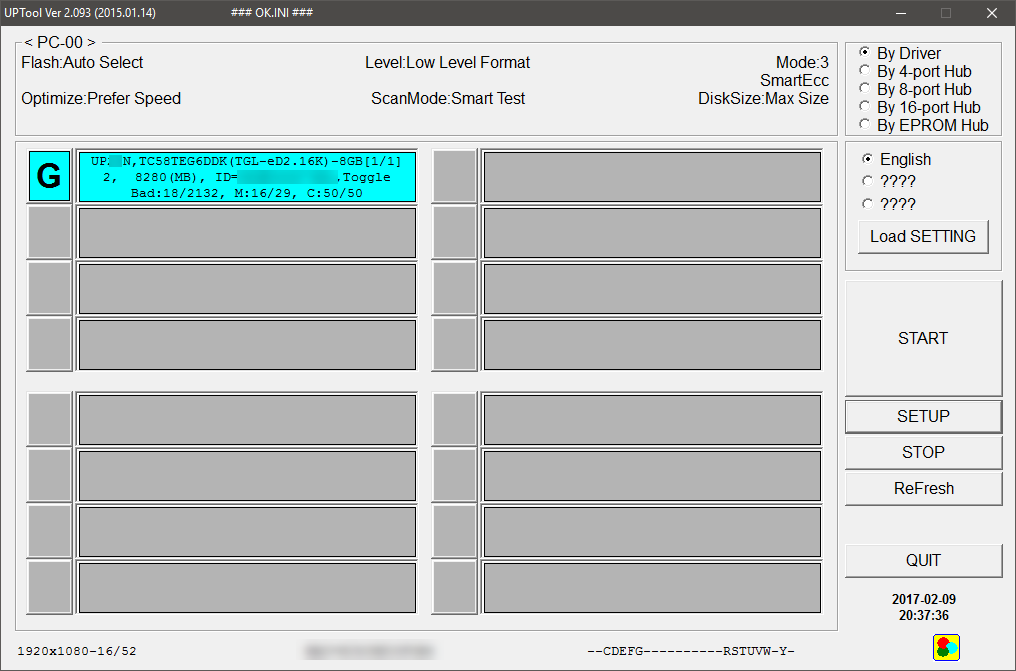
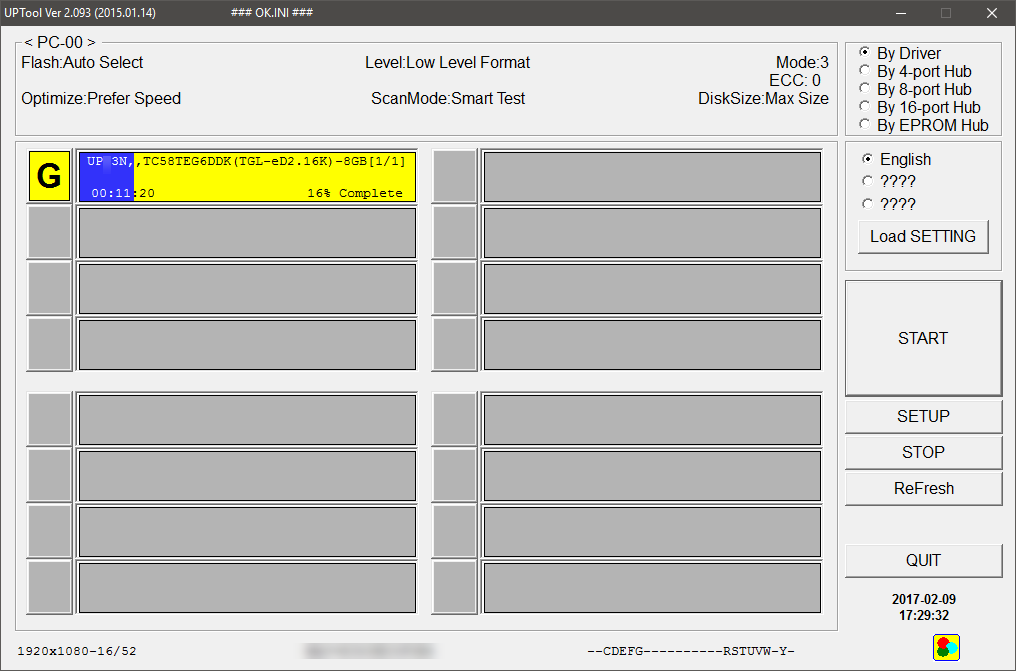
Start UPTool. You will see a bunch of squares and rectangles that are dark gray. If your USB stick is recognized, it will be listed in one of those and show up as a light blue item. In this screenshot, you can see “Bad: 18/2132”. This stick has already gone through the process once, and 18 cells out of 2132 were found to be ‘bad’ and are now no longer in use.
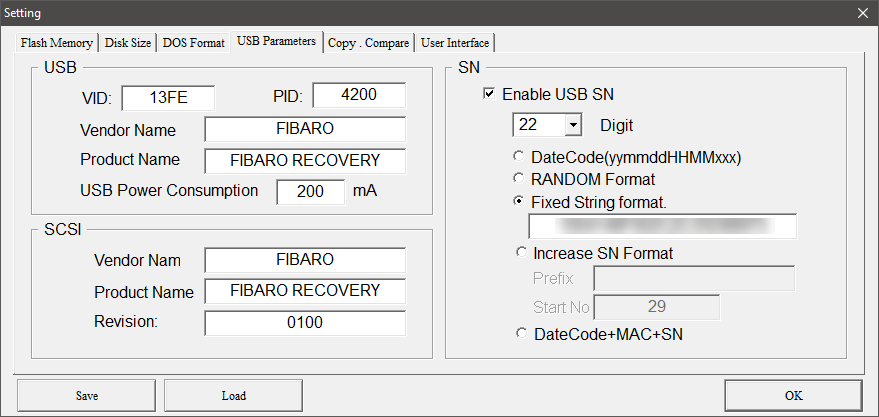
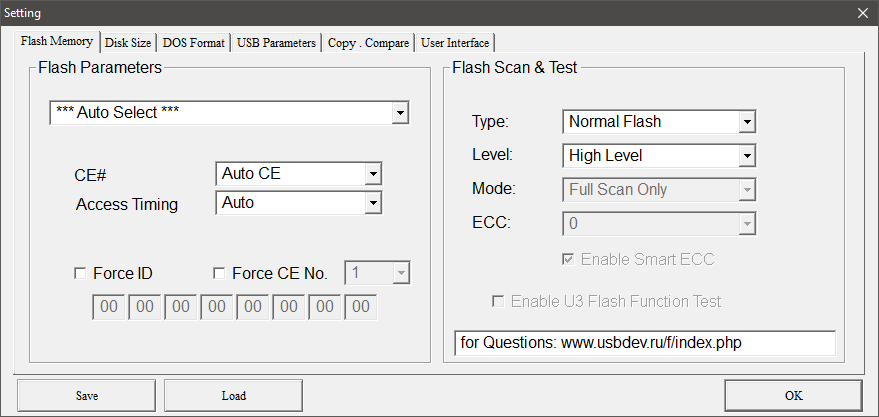
Click Setup and click through the ‘authenticate’ screen (no password) to get the first setting screen. Set things up like this and pay attention that you have VID, PID, Vendor Name, Product Name, all set correctly, and that you put the correct serial number in. All this information comes from the information gained by using ChipGenius earlier.
Warning: if you do not have an image file to restore to your recovery USB key, stop now!
If you have a backup image file, then you can continue by clicking Start in the main screen, and then watch it do its thing. This can take a long time, took about an hour here. Depends on how your stick is doing, how fast your USB bus speed is, and so on. Be patient. People around the Internet seem to be advising not to mess with your PC while this is going on.
Eventually the process should complete. What you will end up with now is a controller and flash cells that now have no partition or storage space configured at all, but all the areas that were bad have now been marked as such, and will be avoided. Now unplug the recovery USB key, close UPTool, and then plug the recovery USB key back in and open UPTool again. Now configure it like this, and leave the other information about VID/PID/serial number etc configured as you left it (basically; what you got from ChipGenius).
And then click Start again and let it do its thing again. This time it will be much quicker, just a minute or so. After this, you’re ready to write the backup image you made at the very beginning, back onto the recovery USB key. If you’re using a tool that automatically resizes partitions, that’s fine; I’ve used Acronis and I’m now using the entire USB key and it works fine. The program is done; you’re ready to re-image/write your backup image file back to the recovery USB key and try the restored version on the HC2!
Troubleshooting
If you can’t read the image off the dead recovery USB key, but the recovery USB key itself is still visible when you plug it in (in ChipGenius and/or UPTool), in other words, still ‘working’ somewhat, then you may be able to still solve your problem. Comparing HC2 recovery USB keys it seems that they are pretty much identical except for the serial number. So if you were able to create an image with Win32DiskImager or some other imaging program of ANOTHER HC2 recovery USB key from someone else, and write that image file back to your recovery USB key, that might solve it. You may still need to use UPTool to ‘fix’ the broken USB key before you’re able to write to it – if the information can’t be read it probably also can’t be written to either. I’m sorry to say that for obvious legal reasons, I am unable to post an image of my HC2 recovery USB key online on my own blog. However, there are 2 places I can link you to where other enthusiasts have posted useful information where you may find the files you need:
- https://www.domotique-fibaro.fr/topic/6824-images-cl%C3%A3%C2%A9-usb/
- https://drive.google.com/open?id=0B1AXBMQhZAKAazB3LWh5MjJqSDQ
Some imaging software automatically tries to resize the partitions to make maximum use of the disk you’re writing to. If you have done this in the past, or you somehow have a recovery USB key that uses the whole 100% of the storage space, you may have trouble writing the image file back to the repaired recovery USB key. That is because after repairing, the bad flash cells are marked as such and will not be used. That means your key will be slightly smaller than it was when the image file was made. In such a case, Win32DiskImager may be unhappy and will not allow you to write your image file back the recovery USB key. The solution for this problem is to write the image file to another USB key that is bigger (16GB or 32GB or such), and then using for example MiniTool Partition Wizard (Free Version) to resize the partitions to be small enough to fit on your recovery USB key. You can then make a new image file (which should be the same size as the three now resized and smaller partitions added up together) and then write that image file back to your recovery USB key. For reference this is what it looks like on the original stick. You can see there’s plenty of spare space there. Also, pardon the French, I stole this picture from a French forum;



Wow what a guide, i haven’t have this problem but i will definitely tire it if i will have this problem.
Hope this post will be here, and thanks to the man that shared this post.
Perfect guide. It works.
My boss had this kind of problem. I assume that this has occurred due to overheating of the USB flash drive in the enclosure.
Thanks a lot!
Uross
Hi,
I have a 16 digit serial number. should I put in 22 or 16 in UPtool?
Hello Henrik,
It sounds like you have a different stick then, maybe a newer version, or perhaps an older version. I’m not sure. I assume you came here because your stick is broken. So whatever you do, it’s not likely to make things worse.
I would advise switching it to 16 digits in the Uptool, and to enter the correct 16 digit serial number. The idea here being that you want to change as little as possible.
Good luck.
Thanks! I’ll try that.
16 digit setting in UPtool worked. My recovery stick is working now. Thanks!
Great, thanks for reporting back!
Hi Johan,
After software update my Recovery stick was unusable again.
But this guide works every time :-)
Best Regards
RH_Dreambox
Hey dreambox. Glad it worked for you. Again. Hopefully one day Fibaro will take notice of this problem and use something more reliable than these poorly made USB sticks.
Hello,
Did you try this?
“The solution for this problem is to write the image file to another USB key that is bigger (16GB or 32GB or such)”
In this case how to make the image file without the unallocated spaces?
I have 4Gig recovery flash drive in my HC2, put the image on a 8Gig flash drive, made the promary partition a bit smaller and made a new image from this drive but it is 8Gig also so I’m not able to put this image to my original recovery stick…
What could be the solution?
Thanks!
The free win32diskimager program is too dumb, it won’t take just the partitions, it does the entire disk. So once you have written your too large file to a large enough medium, you should resize the partitions to a smaller size and use another program to make a new image, but only of the partitions. For example Acronis True Image or another open source tool that can image a disk efficiently instead of so crudely like win32diskimager.
Just wanted to add that when I image a disk with Acronis, it only stores the partitions and not the empty space, and automatically resizes partitions as it restores them.
Thanks for it! I tried with Acronis and I was able to make the new flash drive (to the original flash disk) but unfortunately it seems that it isn’t enough to have the original serial infos set in UPTool as HC2 starts in Recovery mode but shows error messages during bootup and it isn’t able to make recovery as it shows error message on recovery syte aslo when I try to do recovery on it.
It gives error messaage: Some recovery files missing or corrupted.
Hi Alex,
Were you able to solve your issue using the guide.
Did you to create a new backup on the new USB Recovery Drive from the HC2?
Yes, it repaired my backup stick and allowed me to make a new backup.
However, I find their USB stick breaks too easily. I therefore now always run without it and have made alterations to my Fibaro HC2 so it can run without it. When I want to make a backup, I can use the USB stick again, though.
Is it a complex modification? Are you willing to share details?
Means taking your system apart and ripping the USB storage drive out of the daughterboard, then plugging it into a computer with Linux on it, and then editing the grub boot config file so that it boots from the drive itself, instead of referencing a boot procedure on the recovery stick first. Probably a boot repair program could do the same.
To be honest I would advise you to get your system to the latest firmware where the entire repair USB thing is no longer required.
Need your help.
I am unable to start my HC2 with the USB stick. All light will appear
ON except the Service light – it keeps blinking and nothing happens :(
Without USB drive on HC2, no issues and I can connect to the HC2 console.
If I plug the USB to the PC I see the folder for backups, log, network.conf.
Tried the UPtool – reports no bad flash cells.
Then you may need to just connect your HC2 to a monitor and keyboard and boot it up and see what errors are reported. Maybe adjust boot sequence in BIOS. Maybe reload an image of the HC2 backup USB drive back to it. But you may want to investigate simply updating your HC2, because apparently in the latest versions, cloud backups can be done, which would make the backup USB disk unnecessary, if I’m not mistaken.